Audacity is a popular program for indie filmmakers. It’s one of the best audio editing platforms, plus it’s free! In this blog, we want to help you utilise audacity to its fullest and improve your audio editing game. We will discuss audio levels, pitch, removing unwanted background noise and more.
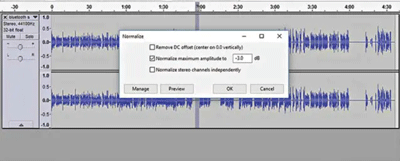
Normalise your audio levels
If the audio levels fluctuate, which can happen when recording a voiceover between people using a microphone, you can adjust the audio level. This can sometimes make the sound seem off-balance. However, not to worry! Audacity has a great tool to fix this.
- Go to and click: Effect > Normalize
- Have a look at the levels (they range from -3dB to -6dB) and confirm once you find the correct level.
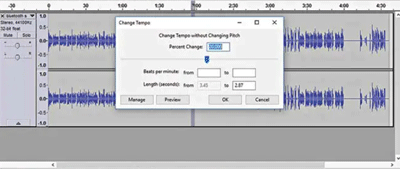
Change the tempo up
Sometimes a filmmaker may want to re-record the audio from the footage if it’s too slow for example. Before you attempt to re-record the audio, it’s worth checking out the tempo tool in Audacity.
The tempo tool allows you to speed up or slow down the audio. Simply go to effects > Change tempo and a screen will pop up allowing you to change BPM, the length and percentage change. Trial it to see if you can alter the speed with it still sounding natural.
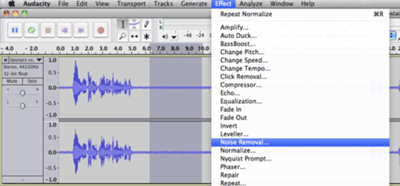
Removing the background noise
So, you’ve finished up recording and you get back to start the postproduction on your exciting film. You then boot it up and notice there’s a lot of background noise and feedback on your footage. Not to worry, Audacity has you covered!
- Firstly, select the area where there is no noise whatsoever.
- Go to effect > noise reduction
- Then click “get noise profile” under step 1.
- After getting the noise profile, open up noise reduction again and click “ok”.
Be careful not dial it up too much as a tiny bit of noise isn’t a bad thing, it gives it a real-life ‘tint’ to your film! This is unless you’re creating a Sci-fi, then you’re welcome to increase or decrease the levels as you please.
Check out our article on reducing noise on Audacity here and noise removal for Adobe Premiere Pro here.
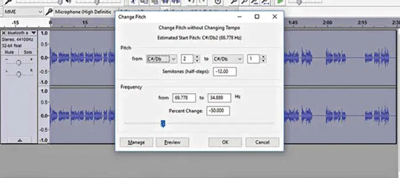
Change the pitch
Ever wondered how to distort the voice of a character? Here you can either bless them with a high pitch squeak or a deep drawl.
To change the pitch, go to effects > change pitch. The tab will pop up and give you the option to change the pitch, either increasing or decreasing. This is also where you can alter the frequency of your audio.
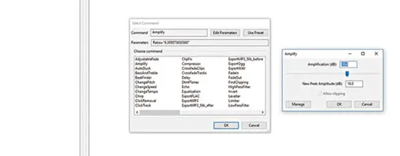
Using the “chains” functionality to apply effects
If you edit clips often and use the same settings repeatedly, it’s worth trialing the “chains” feature.
The chains feature will allow you to make those adjustments with one singular tool. To create or add a new chain:
- Go to file > edit chains.
- Select “Add” and give it a name.
- To add the effects, click “Insert” and scroll through the effects and choose the ones you need.
- Once you select your desire chain, edit the parameters of the effect.
- Then add your next following the above steps, until you have the desired effect.
- Then to apply this chain each time, simply click file > apply chain.
We hope you enjoyed this article, don’t miss out on others by signing up to Filmstro and following us on our Twitter, Facebook and YouTube channel.
P.S. Stay safe out there!