How to stabilize your video in Premiere Pro using the Warp Stabilizer VFX
Sliders, dollies and (particularly) handheld gimbals are increasingly affordable and popular ways to get silky-smooth tracking and handheld shots in an array of situations. However, whether you use fancy on-camera stabilization equipment or not, it’s rare that every shot comes out as effortlessly. Fortunately, digital stabilization has come a long way recently too and Premiere Pro is here to help with its brilliant Warp Stabilizer effect!
What is the Warp Stabilizer?
In the past, to stabilize a shot in post-production, you’d need to spend time motion tracking a shot in a package like After Effects then use your tracking data to apply position, scale and rotation effects to negate the camera’s motion. This was a very manual process and took a lot of time to tweak each shot.
Now, the Warp Stabilizer can do this for you much faster and produce better results. The effect analyzes the motion in a given shot, applies the necessary movement effects to the clip and will also dynamically skew your image to cover up any super serious wobble. Simply put: it’s a massive time saver that can make handheld shots look much smoother. Obviously, there’s only an extent to which digital stabilization can help a really shaky shot, so don’t think this will save you if you’re running around swinging the camera all over the place.
How do you stabilize your footage in Premiere Pro?
Using the Warp Stabilizer is easy. First, drop the effect on your clip in the timeline and Premiere will start interpreting your footage. Once this is complete, stabilization will be automatically applied to your clip with the effect’s default settings.
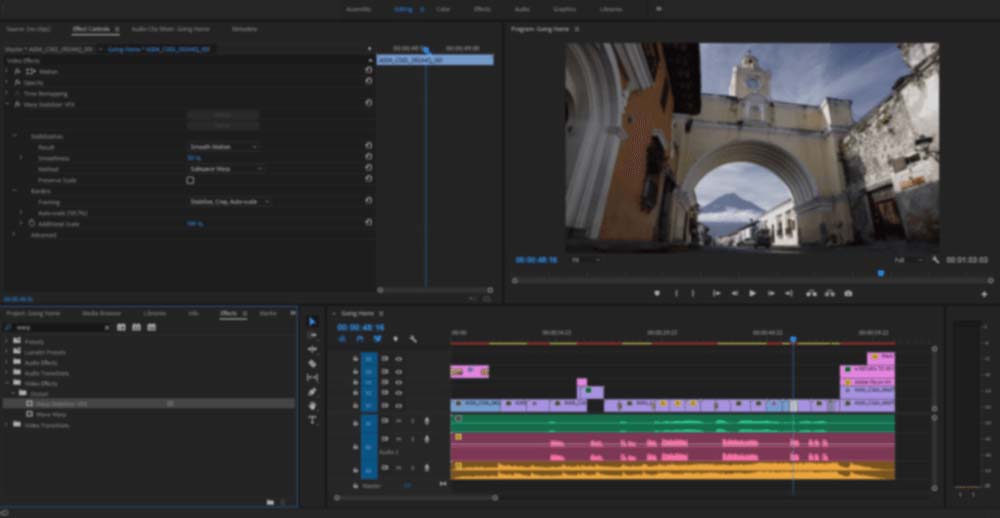
There are a few options you should pay attention to here:
- Result – here you can indicate “Smooth motion” or “No motion”. In most cases, you’ll want to choose “Smooth motion” – “No motion” is mainly useful for handheld shots that do not include deliberate camera movements.
- Smoothness – This is a percentage value that determines the strength of the effect with 100% being the strongest. By default, this sits at 50% but, as with most VFX, we find that less is more. Using smoothness of more than 20% on most handheld shots can create odd distortion. Unless this is what you’re after, we’d recommend starting lower and scaling up.
- Method – This lets you choose how the stabilization is applied. In most cases, Subspace Warp (dynamic stretching and position adjustments) will give the best results. However, you can choose only to use position, scale and rotation based stabilization or skewing instead.
- Framing – This dictates how stabilization looks once it has been applied. If you want to keep your video filling the frame, the default “Stabilize, Crop, Auto-scale” is the best choice. Premiere Pro will automatically increase the scale of your video slightly to ensure the frame is filled. (You can see by how much in the “Auto-scale” drop-down beneath “Framing”.) If you want to go for a different effect, test out the other Framing options.
 It can take a powerful graphics card to play back a stabilized clip at the timeline’s native resolution without pre-rendering, so we’d recommend hitting “Enter” on your keyboard, with the timeline selected. This will create a preview of all the effects in your timeline, including your new stabilized video. If you don’t want to preview the other clips in your sequence, just edit the sequence’s in and out points temporarily.
Once you’ve created your preview, play your timeline and tweak the effect options to get the level of stabilization you want and you’ll be good to go!
Pro tips for stabilization in Premiere
“My stabilized video looks blurry”
This normally happens when there’s a lot of motion in a video and the smoothness is set to be too high. As you increase the smoothness, Premiere Pro warps the image a bit more and often scales up parts of the image to smooth motion. (Check the Auto-scale value in the effect settings.)
Depending on your source files, you may be able to get away with quite a lot of scaling (e.g. if you’re using a 4k file in a 1080p project). But, if your source files are the same size as your project, once the scale increases by more than about 10%, picture quality can degrade quite a lot. If this is happening, try turning down the smoothness to find a balance.
“It’s taking ages to preview all my stabilized clips and I need to get on with my edit”
If you need to stabilize a lot of clips, it can take a while for Premiere Pro to render previews. Our tip for getting the best out of the Warp Stabilizer is not to apply the effect until you’ve locked down your edit. This way, you’ll be working with a mostly complete timeline and be less likely to make edits that require the content to be rendered again.
“My video frame is a different resolution to my project resolution and I can’t apply the effect”
Premiere Pro can only stabilize footage where the source and sequence resolution match. If these don’t match (e.g. you’re using a 4k video in a 1080p sequence), however, all you need to do is nest your original file in a new sequence (Right click on the clip in the timeline -> Next…) and apply the Warp Stabilizer effect in this new sequence. Your changes will then show up your original sequence.
What’s next?
That’s it! You have all the tools you need to get a great looking, stable clip. With your cut locked down and your sequence ready to go, all that’s left is to put your creation into the world. If you want some advice, check out our article on how to export video from Premiere Pro to get an inside look at what we do.
If you have any questions, please do get in touch. Otherwise, happy editing!


