Removing vocals from audio is far more common than you would think – there are numerous reasons to do this such as poor audio quality over a background track which is integral to the plot of your film, or you like the backing track but not the vocals.
Either way, one of the best programs to remove vocals in is Audacity. So, today we will break down the simple steps on how to remove vocals in Audacity, helping to create your perfect film.
How to remove vocals in Audacity
Removing vocals in Audacity is an incredibly easy process – the first step, of course, is to download Audacity. If you have, we’ll jump straight in!
Step 1: Load your audio file into Audacity
Open Audacity up then select File > Open and choose the file you want to make edits on.
Step 2: You need to Split the track
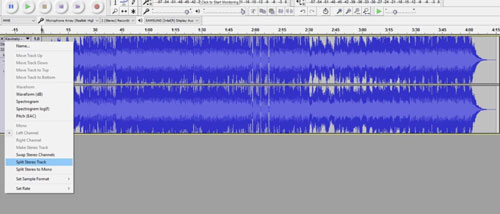
Once you have your audio track in Audacity, it’s time to split it. To split the track, select the menu and choose the “Split stereo track” option, this will then split your audio into left and right channels.
Have a read of another in-depth article we have put together on how to split your audio tracks and rejoin them in Audacity.
Step 3: Invert the bottom channel of audio
Next, you will need to invert the bottom channel of audio. To do this simply click Effect -> Invert from the menu.
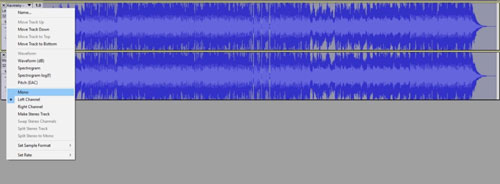
Step 4: Setting each track to mono
Next, you will need to set each of your tracks to mono.
What does it mean to set each audio track to mono? Setting the audio to mono means you are setting each track to have one singular audio source as a final product.
To set each track to mono you need to click down the dropdown menu and click on “mono – left channel” and then “mono – right channel”.
Step 5: Save the track
Yep, you’ve finished and all you need to do is save the track and it’s ready to input right back into your film, commercial or music video.
Click File > Save.
Troubleshooter – Sound volume
One issue that may pop up is that you may notice the sound of the track is now very quiet. Don’t worry, there’s an easy fix to this problem. To fix this, go to the “Effect” tab and click “Amplify” – then set it to a negative level.
If the negative value doesn’t work straight away, have a play around until it’s loud enough, make sure you don’t overdo the volume as it may cause the sound to distort.
We’re big advocates of Audacity and have written several other blogs with top tips on how to make the most out of this software. Check out how to remove background noise in Audacity here, and our top 5 tips on how to get the best out of Audacity here.
We hope you enjoyed this article, don’t miss out on others by signing up to Filmstro and following us on our Twitter, Facebook and YouTube channel.
How to remove vocals in Audacity
- Step 1: Load your audio file into Audacity
Open Audacity up then select File > Open and choose the file you want to make edits on…
- Step 2: You need to Split the track
To split the track, select the menu and choose the “Split stereo track” option, this will then split your audio into left and right channels…
- Step 3: Invert the bottom channel of audio
Next, you will need to invert the bottom channel of audio. To do this simply click Effect -> Invert from the menu…
- Step 4: Setting each track to mono
Setting the audio to mono means you are setting each track to have one singular audio source as a final product…
- Step 5: Save the track


