Audio editing on a budget: Audacity. These days filmmaking can be on the expensive side. It all adds up with the equipment, production costs, and post-production costs. However, we will look into audio editing on a budget and how you can edit your audio to the highest level without the cost.
We will take a look at what Audacity is and key examples of how to get started with Audacity.
What is Audacity?
Audacity is an open-source audio editing and audio recording program that is free. It’s pretty simple to use when you get into it and has multiple audio editing functions like removing background noise in your audio and recording voiceovers for your next documentary.
All in all, Audacity provides you with all the features of a premium audio editing program, but without charging you a large sum of money.
Even if you aren’t looking to use Audacity for the medium of the film it’s a great tool to produce music or start up your own podcast.
Tips when editing in Audacity
Here we discuss a few tips for editing audio in Audacity and simple tricks to make it a smooth, enjoyable process.
Moving audio in Audacity

When moving audio files around in audio editors, usually they’re pretty difficult and are not intuitive. However, Audacity is the complete opposite.
Moving audio files in Audacity is very simple, to move your files use the Timeshift tool. To access the Timeshift tool, press F5 on your keyboard, and the tool will appear. Then click and select on the file you wish to move.
If you wish to overlap the files, no problem at all.
Go to Tracks > Add New.
You can now move them onto separate tracks.
Remove background noise in Audacity
It happens often, as a filmmaker, you head out and get the equipment set up, make sure there are no loud noises to interfere with the filmmaking, you then wrap up filming for the day and head into post-production.
Then WHAM, annoyingly there’s a horrible buzzing noise.
But, fear not. Audacity has you covered. The noise removal tool is easy to use and performs wonders.
Here’s how to get started:
Find and locate a section of audio that only has the background noise you wish to remove. Then Use the Selection Tool to highlight the section of background noise and go to Effect > Noise Reduction. A window will now, click Get Noise Profile.
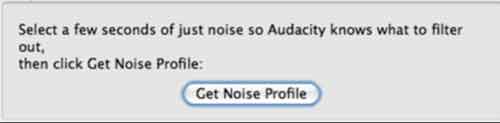
Audacity will now know what the background noise sounds like and will try to filter this out across the audio clip.
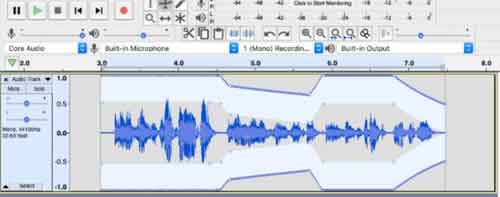
To do this to the rest of your clip, go to Effect > Noise Reduction but this time use the lower section of the window to choose how much to reduce the noise by.
Please beware that messing too much with the levels may throw the sound out and you could be left with a distorted sound. Try and test it a little, until it sounds perfect then export the clip!
READ MORE: How to remove background noise in Audacity
Amplify your audio in Audacity
To amplify the sound simply select your audio and go to Effect > Normalize to amplify it. Make sure you don’t amplify it too much as this may cause a little distortion in your sound and ruin your audio clip.
—-
We hope you enjoyed this article, don’t miss out on many more of our blogs. Sign up to Filmstro and follow us on Twitter, Facebook and YouTube channel.


