Premiere Pro editing tricks:
These tricks will turn you from a mediocre editor in Premiere Pro to a super-efficient master, editing at lightspeed.
Well, not that fast, but pretty quick! The art of editing is underestimated, and to perfect an edit can take days. So sometimes it’s nice to take a shortcut or two.
These shortcuts and editing tricks in Premiere Pro will not only speed you up but will improve your editing ability in no time.
In this article, we will breakdown the top editing tricks you MUST learn in Premiere Pro; let’s check them out!
The editing tricks in Premiere Pro all filmmakers MUST learn!
Here are the key editing tricks as a filmmaker you must learn in Premiere Pro. These tricks will help you become a better editor in minutes. These tips will help you edit in a more efficient way, improving the quality of your film.
Here are the editing tips in Premiere Pro you must learn today!
Keyboard Shortcuts
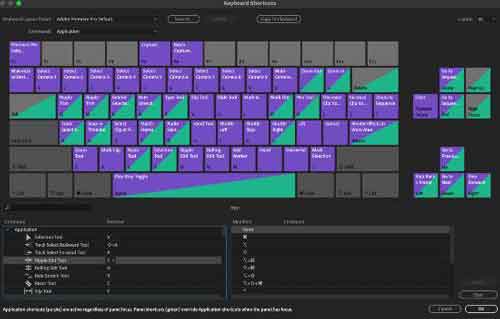
Keyboard shortcuts are imperative to improving your editing skills within Premiere Pro. These shortcuts will save you hours (we’re not exaggerating) a week in the editing suite, allowing you to work on more projects or have more time to yourself.
Keyboard shortcuts can be accessed here by clicking Shift+Command+F.
These will already be set up, and you can read through the current settings and see which shortcuts work for you.
If the one your in need of is missing, no worries, you can click on the empty space of the keyboard shortcut image and add them there.
This way, your editing process will speed up pretty instantly as you’ll have access to a number of tools with a simple click. Rather than a few clicks to enter into menus and then having to trawl through multiple options for a tool.
Preset Transitions
We recently put out an in-depth list of the best-preset transitions that will save you an incredible amount of time trying to cut up and transition through the shots.
These transitions don’t need you to set up keyframes or spend hours keyframing the minuscule detail to transition from A to B. They are simply ready to go, just drag and drop them in, and you’ll have a cinematic transition in seconds.
Here’s our list of the best-preset transitions in Premiere Pro, honestly they’re mindblowing.
They will save you time and effort. Also, they’ll add more quality to your project. Check them out today!
Using Lumetri Colour
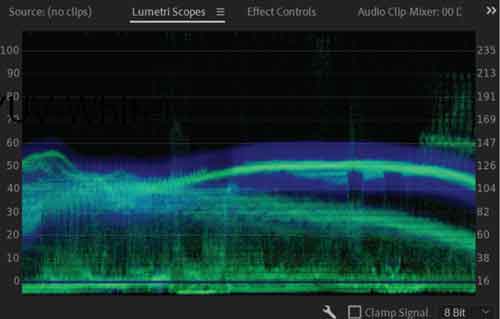
Lumetri Scopes is a godsend; it’s beneficial and will allow you to pick things up that the naked eye just wouldn’t.
Using the Lumetri Scopes function in Adobe Premiere Pro allows you to analyse your footage in a detailed manner. There are certain colours or shades the naked eye will not see, and you’ll only notice once your films complete.
You can analyse the colour scopes to ensure you haven’t got too many anomalies and distorted colouring that would only show up once the film is completely processed.
For an in-depth breakdown of Lumetri Scopes, read our full guide here.
Using Lumetri Scopes will save you a lot of time; you will be able to see any colour inconsistencies. This allows you to adjust the colour grade before it’s exported to the big screen.
—-
We hope you enjoyed this article and don’t miss out on any of our other blogs! Sign up to Filmstro and follow us on Twitter, Facebook and subscribe to our Youtube channel.
Check out our royalty-free music today by clicking here.


