Final Cut Pro X is one of the top video editing platforms out there. It has an incredible array of video editing tools and the tools in scope today are the in-depth colour grading features that will take your colour grading to the next level.
The tools provided by Final Cut Pro X will assist you in improving your colour grading levels and give your visuals a creative edge. In this article, we will take a closer look at the colour grading tools and the best ways to implement them, so you can get a cinematic finish on your video footage.
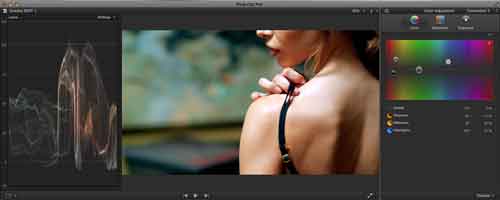
The colour wheels
The colour wheels in Final Cut Pro X provide you with another layer when it comes to colour grading. Using these allows you to add more adjustments to the colour, for example, you’ll have access to colour exposure and colour distortion to a much more detailed range.
These in-depth options will help you colour grade your footage to give it a defined look and feel, really pushing the production value further.

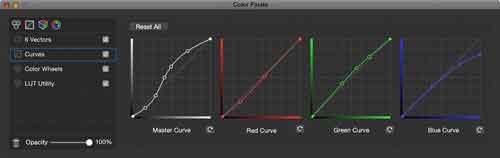
Advanced Colour Curves
Colour curves allow you to refine and work on the contrast of your imagery to give it the best quality finish you can provide. The colour curves are red, green and blue and provide you with the option to improve the quality of your footage.
To get the best out of these, make sure you keep a good balance of the RGB and don’t make it too extreme as you’ll either fade your image out or turn it into an overexposed monstrosity. Subtlety is key when adjusting the colour curves.
The colour board
The colour board allows you to adjust the tint, saturation and hue across your footage. It is a great feature to Final Cut Pro X and is extremely intuitive. It’s the first place you should go before you begin the colour grading process.
Quick colour grading: Using Final Cut Pros LUT’s
Firstly what is a LUT? Simply put a LUT is known as a ‘Lookup Table’. It is essentially, a predetermined set of numbers that are computed into the file that converts your input values from the camera filming into your output values (the final film).
This means the LUT transforms your footage when you bring it into Final Cut Pro X providing you with a defined finish to the footage.
Here are some reasons to use a LUT:
- Use it as a reference point so you can master your own style of colour grading.
- Increases efficiency, by using the LUT you save time and speed up the post-production process.
- You can have a predetermined LUT that has the style and colour grading already preset to your liking, ready to implement once production has been completed.
Overall, using some of the Final Cut Pro LUTs will give you a sleek and pristine finish to your footage, saving you time and improving efficiency.
—-
We hope you enjoyed this article. We have many more articles on our blog page. Sign up to Filmstro and follow us on our Twitter, Facebook and our YouTube channel.