Colour grading is the process of improving an image or video’s appearance by altering various attributes (temperature, tint, contrast, white balance and so forth). It’s a hugely important aspect of post production. In fact, within filmmaking as a whole. There are multiple ways to colour grade within Adobe Premiere Pro, so we thought we would break down the integral aspects for you below.
Adjust your white balance
Depending on how your footage was shot you will want to have a look at altering the white balance. Most filmmakers shoot with a neutral white balance, or they set their camera white balance functionality to auto on their camera. This allows you to edit the white balance to achieve the correct mood.
Two of the core factors to focus on are the tint and the temperature. This helps you match the grading to the mood of the scene and integrate it with the right background music – nailing this combo is integral to captivating your audience.
Read more: How to remove background noise in Premiere Pro
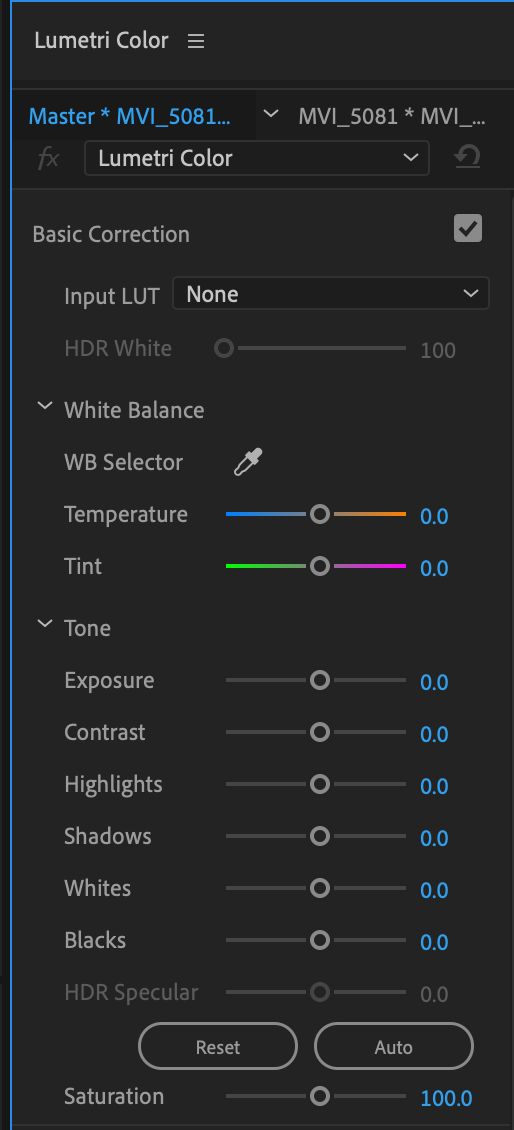
The Lumetri panel
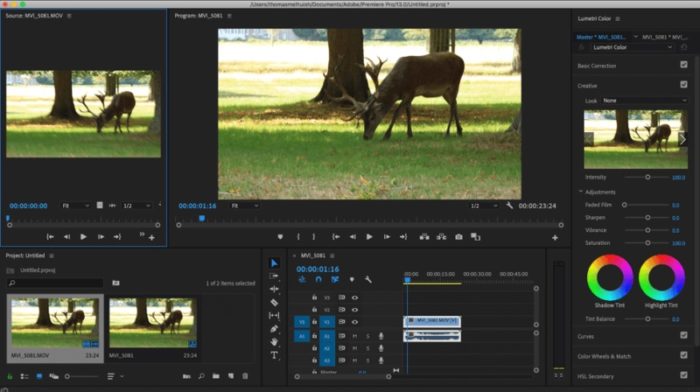
It’s a lifesaver.
With the Lumetri functionality, you can edit all aspects to the colouring of your film.
The tint, temperature, contrast, exposure, highlights. This allows you to edit to the mood of the film or selected scene, to match the audio and action happening on screen.
It’s always best to sit down and assess the footage and the mood of your film with the people involved and have an idea of what you want to achieve before you get started. This will give you a structure to the process and a solid grounding.
*Check out Christian’s tutorial on colour grading. It starts at 3.05
Use the Lumetri scopes function
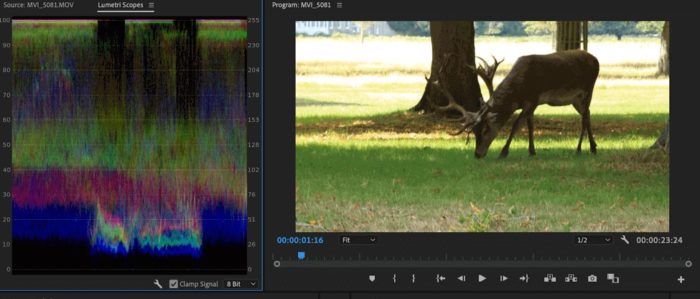
Using the “scopes” function in Adobe Premiere Pro allows you to analyze your footage. Nine times out of ten you will have missed something important when it comes to the colouring of your footage. The colour grading process is a bit of a mathematical task and scopes makes this a lot easier to understand the adjustments you have made throughout the colour grading process. It’s a fantastic way to analyse your initial colour grading.
*Here is a detailed Lumetri scopes tutorial for filmmakers.
Consistency!
You MUST make sure there is consistency when colour grading.
You can’t have your protagonist crying in a dark, gloomy room to their therapist. Then all of a sudden it flicks to the next frame and they are in the same room professing their darkest, deepest issues with the contrast, brightness and warmth set the maximum. It will confuse the s**t out of the audience and you’ll lose them.
As mentioned above planning the colour grading beforehand will ensure you have no slip-ups along the way and stays consistent throughout.
To recap:
- Adjust the white balance, ensure you shoot flat.
- Use the Lumetri panel, it will be your best friend!
- The scopes function will spot something you won’t. USE IT.
- Always match the colour grading throughout the same shot if it’s in the same scene/location/setting.
- Plan! Always plan before your colour grade.
If you enjoyed this article, don’t miss out on many more and sign up to Filmstro and follow us on our Twitter and YouTube channels.